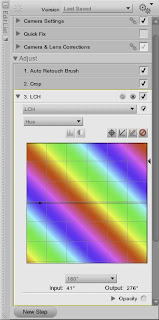
After I got my IR-converted camera back I googled long and hard to find a workflow that would mimic the Blue-Green channel swap one can easily accomplish with Photoshop's channel mixer. There is no channel mixer on Capture NX 2.0, so I wondered how it might be done.
First of all, I love Capture NX 2.0. It is the best way to work with Nikon's RAW files (NEF). I use Capture NX 2.0 for all my processing and only go to PS CS3 if I need to do pixel editing (cloning, etc.).
So is there a way to process infrared NEFs with Capture NX? Yes, there is. I'm not going to tell you how to do all of the processing. Just the part that relates to images captured with your IR-converted camera. I have Nikon D70s with an "enhanced color" IR conversion from LifePixel. But what I outline here applies just as well to standard IR conversions as well. Here it is:
1. In the "Develop" section of your "Edit List" tool bar on the right, open "camera settings" and set your white balance. I do it with "set grey point" and use the marquee tool.
2. While in the "Camera Settings" go to "Picture Control" and chose "Vivid."
3. Then click the "Advanced" toggle just below "Picture Control," go to the "Saturation" slider and drag it all the way up to "9." [I'm not sure if this is the best for "standard IR conversions," but it works well for "enhanced color."]
4. Leave the "Camera Settings" and choose your white and black points (and your neutral point, if you think you need it).
 5. Now, here's the cool part. Click on the "New Step" button. Select "Color" and then "LCH" from the pull down menus.
6. Click on the pull down menu that says "Master Lightness" and choose "Hue." That will bring up a colored hue box. Below the box there's another pull down menu. Click that and select 180. Notice that the hues have all slanted. (See the illustration to the right.)
7. Go to the triangular slider on the right side of the box. Slide it about two-thirds of the way up until the red and blue channels are switched. Watch your image. You'll want to experiment with the best place to put that slider. The red sky has now become blue.
8. Once you've done this you can tweak the image any way you want with more color points, curve adjustments, etc.
That's it. Enjoy!

4 comments:
I would be curious how to do that in Photoshop. If you have any good links pass them along.
Thanks,
Also, the Des Moines Photo walk was a success. Lots of fun.
Doing it in PS isn't difficult at all. Go here and watch the video tutorial:
http://www.lifepixel.com/digital-infrared/instructions.html
Thanks. By the way, on your winner board for the STL photo walk was the last honorable mention photo yours? (IR Arch and pink sky?) That is great.
Thanks, Mark. No actually, the Arch Park Wonderland (blue IR) was mine. As the leader the winning photo couldn't be mine. Someone else had an IR converted camera and took some great shots!
Post a Comment